


Hey there Workflowy folks. As of today you can now name your starred searches. This change lets you take your custom searches and give them easy to recognize names. Previously you had to remember what each starred search meant which wasn’t the nicest of experiences.
If you’ve never starred a search before, you can do so by zooming into any section of your Workflowy account, performing a search, and then clicking the star icon in the search bar. This not only saves the search but also the location where the search was performed. Starred searches are displayed in the sidebar under the ‘STARRED‘ section and can be identified by the magnifying glass icon they start with.
An additional benefit of this update is that your named searches also appear in the ‘Jump to‘ menu. So for example, if you star a search and name it ‘Overdue tasks’, you can now also search for that in the ‘Jump to‘ menu to instantly perform the search without taking you hands off the keyboard.
How do I name a search?
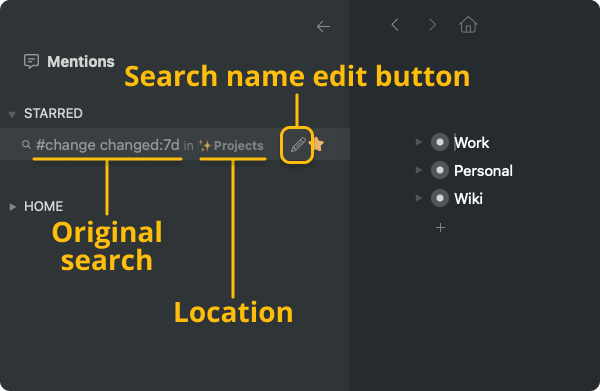
Naming a search is done in the left-hand sidebar under the ‘STARRED‘ section.
1. Open the left-hand sidebar
2. Expand the ‘STARRED‘ section if it’s collapsed
3. Move your cursor over the starred search you want to name
4. Click on the pencil icon on the right side of the starred search
5. Type the name of your search
6. Hit ‘ENTER‘ to save the name
How can I use my named searches?
Named searches are displayed under the ‘STARRED‘ section of the sidebar. You click a named search to perform that search. You can also use the ‘Jump to‘ menu to perform the searches even faster.
1. Hit the keyboard shortcut for the ‘Jump to‘ menu (Windows: CTRL + K, MAC: CMD + K)
2. Type the name of your search
3. Hit ‘ENTER‘ to perform the search

And that’s it! A simple but useful update that makes starred searches nicer to use and more useful. Let us know if you already use starred searches and what you think of this update in the comments below.
Until the next one!