
Whether you’re a lifelogger who logs the metrics of your every waking moment – or you’re just wanting to log a couple of key areas in your life, WorkFlowy has a brilliant solution involving tags… and counting those tags. It’s one of those “Why-didn’t-I-think-of-this?” type dynamics. I’m going to show you how to record Pomodori (time blocks of 25 minutes), sales figures, “Don’t break the chain!” routines… and pretty much anything that answers the questions, “How much?” or “How long?” in graphical structures resembling…no, exactly like charts. In WorkFlowy. Then Rawbytz is going to take you to WorkFlowy Wonderland with his WFcount Bookmarklet. Oh, and I’ll post a complimentary download link to the “Stylish” chapter of my book.
All your ducks in a row
You’re going to need to use a “Monospace” font to make things line up nice and pretty in WorkFlowy. WorkFlowy Pro users have two such fonts bundled into the Settings menu: Typewriter and Terminal.
A Monospace font gives you equally sized, fixed-with characters. So if your tags have an equal amount of characters, they will line up – that is if your prefixed (date) info. has an equal number of characters on each line.
Here are my sleeping patterns since January 1st (I’m using the Stylish extension, by the way):

- Each dark gray block is a “#z” tag, representing 30-minute increments of sleep.
- Each light gray block is an “#n” tag, which shows 30-minute periods of napping during the day.
WorkFlowy minimalism: no prettified tags
If you’re not into the Stylish extension (or predominantly use a mobile device), you can hit any tag to filter for all instances, and you get yellow highlighted tags. Here are my book-sales figures from October 26th to November 29th. Each “#b” tag represents a book/ unit sold (I’ve flipped this iPad screenshot on its side):

Color my world
The following screenshot shows my book sales over the last 3 months:

He works hard for the money
I do a lot of Pomodori. That is to say, for focused periods of concentration, especially when writing, I break my work down into 25-minute-time-boxed-bite-sized blocks of time. Here’s a WorkFlowy graphic of the amount of Pomodori I put into writing my book (I’ll give you some figures in a bit). Each block you see is just a “#pwf” tag:

Don’t Break the Chain!
You’ve got to try Jerry Seinfeld’s “Don’t Break the Chain!” productivity method. I’ve written about it in my book, but here I’m expanding on things visually. Here’s the time I’ve put in to the WorkFlowy blog since January 4th:

I have a small list I’m currently keeping track of in WorkFlowy. Some items are part of a Don’t break the chain! effort, while others I simply record at the end of the day. The items with the ∞ signs are ones that I don’t want to break the chain on. Here’s my template:

If I filter for my “#fdr” tag, you’ll see my Don’t break the chain! routine for improving my culinary skills and knowledge about food in general. I put aside 10 minutes a day – every day – to learn something new about food or pull a great recipe off the web. So far I haven’t broken the chain. Neither have I broken the chain with any such routine I’ve manned up to in the past:

- Notice that here, I am not interested in how much time I’ve spent on this particular activity… what is highly motivational to me is seeing that I have an uninterrupted series of lime-colored tags. You’ll only experience the power of this productivity hack once you’ve tried it for yourself (in or out of WorkFlowy).
I’ve started learning PHP as part of an effort to learn to code for WordPress. I set aside a Pomodoro (25 minutes every day) to systematically learn something new. I haven’t broken the chain yet (albeit early days!):

What if you or I were to break the chain? I shudder to think… but just for argument’s sake:

Above you will see that I record how many TV Series episodes I watch daily. I’m not trying to not break the chain on this one. But… you will see that on January 4th and 11th, I was not able to indulge in this guilty pleasure. Actually, no guilt there. Those black tags really stick out! You’ll notice that in the search bar I’m filtering for “tvs”:
- “#tvs” is my tag for an occurrence
- “@tvs” is my tag for a non-occurrence
- Thus, to filter for both, I search for “tvs” This is the tell-all letter combination.
- The same goes for all other tags… they come in two’s. A colored tag and a black tag (in case).
Logging VS. doing
I keep the above metrics in my “Lifelogging” outline and link to my “@DBTC” (Don’t break the chain!) outline, nestled under “Not Urgent/ Important” in my “Eisenhower Matrix”. In this outline, I have a small list of activities I focus on daily:

- I also link from here to my “Lifelogging” outline
- I keep a tally of days covered for each effort or project and a minimum of time I’d like to spend on each. Each of these lists either contains an internal WorkFlowy link to the actual project outline in another part of WorkFlowy… or actually contains the entire project itself right there.
I’m creating a list of all the Unicode characters known to man, which I will share with WorkFlowy users once I’m done. I have a nice little system which will help you find those hard-to-get characters you usually need to Google to find:

Here’s what the inside of my Food/ Recipe research outline looks like:

This and that: Juxtaposing
Because I have date information at the beginning of each bullet, I get to dice up my information any which way I want when I filter for months or days: I could filter for specific days in specific months by using the search syntax, “Jan Mon”. I could compare sleep patterns for different days by using the OR operator: “Mon OR Sun”, and WorkFlowy will narrow things down for me.
Below you’ll see that I’m filtering for number of hours slept and number of Pomodori spent learning PHP over the last 3 days. Since I squeeze my code-learning in last thing in the evening, it’s no mystery that the more I learn, the less I sleep at night (light gray blocks). Of course, I don’t need WorkFlowy metrics to tell me that I’m losing sleep over something in particular. This example serves to illustrate how one can juxtapose any data you want:

WFcount bookmarklet

If you’re an Android, like Lt. Commander Data (from Star Trek’s, TNG), you won’t be needing a tag-count tool. In fact, you won’t need WorkFlowy. But for all humanoid WorkFlowy fans (excluding alien races like the Bynars who have synaptic processors), Rawbytz’s WFcount tool is a must have. With a click of a bookmarklet, you get a count of all tags in any context (and some other goodies) sorted by title.
Whether it’s for research purposes, compiling a WorkFlowy tag index… or getting a tag count for your Lifelogging data, WFcount has got you covered. For many, this will get your blood going. See Rawbytz’s post to understand the pun. Installing the bookmarklet in any browser is a one-click (drag) action. It doesn’t get any simpler. So no excuses. Visit Rawbytz’s blog and get the WFcount bookmarklet.
Let’s apply Rawbytz’s WFcount tool to a couple of my outlines above:

What we glean from the above WFcount window is that I’ve sold 804 books over the last 90 days. I get 104 children lists – which is accurate, since I’ve nested my data in weekly outlines – because I like it that way… so one needs to be aware of what’s going on in any outline and adjust the numbers if necessary. The tag count, however, is accurate – down to the last book.
Below you’ll see that it took me 1058 Pomodori (529) hours to write and publish my book. Since I’ve nested my data across 5 months, I know this particular project took me 120 days exactly from start to finish. And I get all of this information instantaneously by zooming into a particular outline and hitting the WFcount bookmarklet in my browser’s toolbar:

You can even install this bookmarklet on Mobile!
Wait a second! How about those color tags?!
The tweaked CSS code came from Rawbytz’s “WorkFlowy Custom Tag Colors” theme and the inspiration came from Stefano Rausch’s “Zen Colour Labels” – both on userstyles.org, which is an index of themes that can be used with the Stylish extension.
Also… about that book chapter on Stylish I promised. Click here and the PDF will start downloading in your default browser immediately.
And… here’s a shared WorkFlowy list with my own personal Lifelogging Tags CSS that you can copy to Stylish and tweak as you wish.
When filtering for/ clicking on any of your colored tags, if you’d like to get rid of the search result highlight color, you can temporarily activate the following style:
/* Search result color */
.content .contentMatch {
background-color: transparent;
color: transparent !important;
}
UPDATE: Since a couple of users have reached out and asked for a template to tinker with, I figured I’d share the link to the general “Lifelogging” outline I use daily. Just keep in mind that it will look nothing like you see in the screenshots above until you are both using a Monospace font and have the right CSS code installed in the Stylish extension.
Get EXCLUSIVE bite-sized WorkFlowy updates: tips, tricks & news about FREE online workshops with Frank Degenaar. Sign up here.


> UPDATE: Since a couple of users have reached out and asked for a template to tinker with, I figured I’d share the link to the general “Lifelogging” outline I use daily.
Hi! Thanks a lot for this method. Only a very intelligent person with a broad outlook could come up with such an elegant method.
Unfortunately, the link isn’t working. Could you fix it, please?
Hi Frank, I’m amazed by your innovative idea of using workflowy to visualize daily time spend.
I have a problem when trying to use your lifelog timplate to show the stylish square in the search result.
After applying the stylish CSS to the lifelogging files. They do display beautifully in different color square. However ,when I search such as ” #z OR h1″ The searched “#z” is displayed as “#z” with yellow highlighted background rather than the style we set. Seems workflowy would override the stylish extention while showing search result. Do you have any suggestion to fix it ?
Thanks!
Hey Frank. Superb work you do with Workflowy. I’ve purchased the book and have followed pretty much all of the advice. Thank you. One big issue: I’m having the same problem that Jason was having above. My search results don’t return my actual colored boxes. They just have the tag name itself in the results, exactly like the first screenshot that Jason sent you. I’ve tried all of your coding suggestions yet I still get the same results. You have any idea how to make this work? I know it’s just an aesthetic thing, but I’d sure love to just get colored boxes in my results like you do, instead of the boring old tag names! Can you help?
Hey Elliot, could you post an example snippet of your code? In the above examples, Jason did not include a background color, to which I gave an example. That might be your issue… but we’ll see.
Here is a sample:
[ title~=”#sha”] {
background-color: #BC901A !important;
font-family: monospace !important;
color: #BC901A !important;
}
Works for me, Elliot. Also, remember to check your quotes… that you don’t have 2 open quotes or 2 closed quotes… which is unfortunately how it gets pasted into a WordPress comment (and how it would end up in Stylish if you copied directly from the comments here). Make sure you have “sha” and not ”sha”. Open quote and closed quote. Check that in your style. You could also try disabling all other styles to see if there’s any conflict.
[…] wrote about colored tags in this post. You can also install this Stylish […]
Hi Frank,
Added the css for the search… now I can not see any search results.
Here is a screenshot of the #z tag css:
Re: capitals: am I to duplicate the css of lowercase tags into uppercase?
I am not using any instances of #Z in workflowy or css.
Thanks,
Jason
Jason, your code does exactly what you told it to do. You haven’t given it a background color. You need to copy the code I linked to in the post. Here’s an example:
[ title~=”#z” ] {
background-color: #008000 !important;
font-family: monospace !important;
color: #008000 !important;
}
1) You need a background color
2) Make your background color and text color the same
3) I suggest using “~” instead of “*” because an asterisk gives you a wildcard situation, where #z, #zoo and #zombie will all inherit the same background color.
4) You’ll need a monospace font if you’re going to juxtapose different tags and add other info.
5) Just copy the code above (but fix/replace the quotes after pasting into Stylish, because pasting to/ copying from this blog will alter them). Better still, copy a code selection from the link in the post.
Thanks for the detailed help, Frank.
I hope you’ve managed to get it up and running. All systems go on your side?
@Frank –
This is a tremendous blog post and use of Workflowy. I have been reading a lot of your work and been mesmerized by this simple yet powerful way to leverage tags.
However, I am stumped. Despite following all of the directions, installing the two stylesheets, assigning colors to my tags, using monospace, etc… I do not see “squares” representing my tags, I just see colored tags when I run my searches.
What am I missing?
Thanks for your help!
Jason
Hi Jason, could you link to a screenshot so I can see what you’re getting?
Also… when searching/ filtering for your tags, you may want to temporarily make your search result highlight color transparent:
/* Search result color */
.content .contentMatch {
background-color: transparent;
color: transparent !important;
}
Hi Frank,
Here is the screenshot: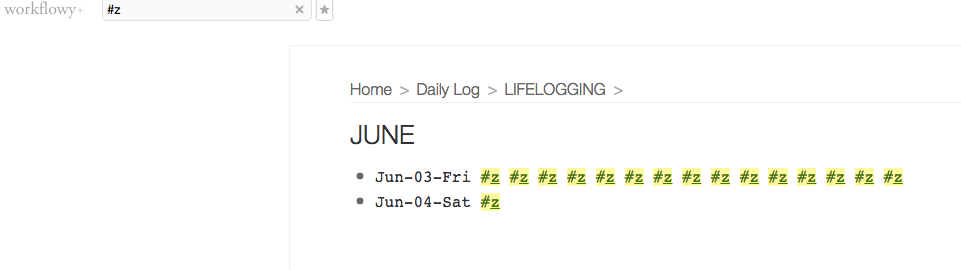
Thanks for having a look,
Jason
You need to use the code I gave you to hide the search highlight color (in a standalone style)… And… Please include a screenshot of your actual CSS for your #z tag.
Make sure that you’re using uppercase or lowercase letters in both your CSS and in WorkFlowy. They need to match.
What kind of devilry is this!?! 🙂
I’m just starting to dig into Stylish and the various scripts to make WorkFlowy that much more awesome. Huge thanks to Frank, rawbytz, and all the others here who are figuring out, creating and sharing so much about what can be done with WorkFlowy.
Now I’m off to try and figure out this awesome color block / don’t break the chain thing. Looks like magic quite honestly… so I’m about to test my Harry Potter skills.
(this explanation is way too wordy. But I didn’t have the time to make it shorter 😉
Thanks for the idea! Reminded me of something I wanted to try a little while ago. It’s the same principle, just much more basic. I don’t always have the patience to adjust/switch styles. I don’t want to use a mono space font throughout my document.
http://drp.mk/i/GT2jFGR6T
I’m not really sure how applicable this is to other things to track, but for book reading I think this will work. I tagged my currently reading list with a weekly review tag to make sure I remember to update this frequently enough. And then I just use about 20 “pipe” characters (shift+back slash) to designate the length of the book. Just picked that number arbitrarily because 10 seemed too small. Then I’ll divide the total book pages by 20 and every time I read that many pages, I add a new character to my progress. So by way of example, this book has 400 pages, so each “segment” is 20 pages. So when I get to page 100, that’s 4 marks.
Nice and very basic approach @dustying.
First of all: Excellent post ( again ) Frank. Instead of buying ( another lifelogging / tracking ) application, just use WorkFlowy — awesome!
I am tinkering with a slightly different approach, but more about that in a later reply.
Regarding Amir’s and your discussion about additional information for tags, I just want to through in that the following additional separator is valid to and might help in differentiating specific use cases according to one’s need:
– [ : ] You can use the colon only to separate chunks of information and not at the end of the tag, as you can do with [ – ] or [ _ ].
My use cases are to #use-the-dash for compounded tags and the colon for #general-tags:with-specifics … or the combination of both, as just shown.
Hence @Amir you could use the colon to introduce more details, e.g. @created:2016-01-20, which looks more distinct than @created-2016-01-20, at least for me. At the end of the day it is a matter of preference.
Good info there, Stephano. I was unaware the colon works as an internal tag character… I thought it was only an acceptable tag boundary character. Hmmm, internal tag colons will create a display bug in WFcount… need to adjust some things.
Indeed @Jay Rawlings, I can **see** the issue with WFcount too.
@Stefano Fixed. Get WFcount v1.2 here: https://dl.dropboxusercontent.com/u/8681219/WFcount.html
Thank you @Jay Rawlings! It works like a charm 😀
I am using tag coloring but not at this extend. I am wondering if someone could help me with something that I’m trying to figure out how to do for a while.
I usually put extra information related to tags right after them in a parenthesis e.g. `@created(2016-01-19)`. When the coloring applies, it only colors the tag but not the extra information. Is there any hack that I could color the rest too. If that’s hard, if it’s possible to color the line that they are in would work too, since I usually use them in separate line.
Ps. I wrote [Workflowy Journal](https://medium.com/@amirmasoudabdol/workflowy-journal-d33405065d64) while ago.
Thanks,
Amir.
Hi Amir,
First, to include the information in parentheses, you need to connect it like so:
@created_2016-01-19
OR
@created-2016-01-19
And with the Stylish CSS for your colored tags, you’ll need to include the following:
[title*=”@created”] {
OR
[title*=”@created_2016″] {
The asterisk in the code above acts as a wildcard and will color any tags beginning with “@created”
You decide whether you want to extend the tag to differentiate between years with different color tags.
A great way to color the whole line (either color text or colored background) is to use the “Painter for WorkFlowy” Chrome extension. You can hide your tags with Painter for WorkFlowy if you make those particular tags transparent in Stylish.
Great hacks! I love the idea of having different things for different lists, even just for fun. All my recipes will soon be in a handwriting style font.
Hi there,
thanks for the feedback. Great to see. Nice explication, frank.
THIS. THIS RIGHT HERE! I’ve just been starting to track stuff in workflowy (using the don’t break the chain model) and this is great! The one thing I’m trying to figure out, is there a way to just have monospaced font for the date headers? I’ve been turning the style on and off when I’m working in that area, but it’s clumsy. I just find monospaced fonts hard to read and don’t want the rest of my workflowy in it.
Ivy, Monospace will grow on you :-). Just to think, I’ve been using “Gotham Rounded Light” for over a year… so that’s a huge change for me. Give it a couple of days and it might stick. BUT… there are multiple solutions for you. Here’s the simplest:
Pop this code into a new Stylish style sheet and keep it on always:
/* Ivy hacks the underline span!! */
span.contentUnderline {
text-decoration: none !important;
font-family: Monospace, Consolas !important;
}
What this code does is it hijacks the Underline emphasis and makes everything you underline what you specify instead. In the above case, you’ve got two fonts (Monospace and Consolas) which are both fixed-width fonts and should do the trick. You could substitute your own.
What I would recommend is that you also underline your tags (everything that’s in your line) because having an equal amount of characters for all tags does not ensure that when you juxtapose different areas (tags) that they will line up.
If you already use underline a lot in WorkFlowy and you would prefer not to hijack the underline span (or you’ve already hijacked it for something else) you could do the following…
Substitute this:
span.contentUnderline {
For one of the following:
span.contentUnderline.contentBold {
span.contentUnderline.contentItalic {
span.contentUnderline.contentBold.contentItalic {
1. Bold + Underline
2. Italic + Underline
3. Bold + Italic + Underline
Oooh… Yeah, why didn’t I think of that. It’s even in your book (there’s a lot in your book, so I have to go back to refresh from time to time) but I was already using underline for highlighting. But I can use another combination for monospace in my “don’t break the chain” area.
In the spirit of sharing, here’s my hack for making calendar entries. I like to have each date for the month in order, to I make sure I don’t forget to enter the things I’m tracking (which includes tags, but also sub-bullets with details on my workout, what we cooked for dinner, etc.). But making the lists of dates and days was kind of a pain (is the first a monday this month?).
So I figured out how to cheat with Excel. I format a column as a custom date format: [$-409]mmm\ dd – ddd\ This formats the date into the form: “Jan 15 – Fri”, which is what I use for my log. Then I type the first day of the month in the top cell (Jan 1, 2016 — which gets reformatted into my format), grab the little corner anchor, and pull down. Excel will obliging increment the date and days correctly for the current rest of the year (and far into the future if I want).
Then I just copy the cells and paste them into workflowy, which obligingly puts each cell into its own bullet.
Thanks for all your efforts here. While there are real new features I really want (all having to do with dates, reminders, and calendar syncing), your hacks keep making workflowy more and more valuable.
Hi Frank and Ivy,
I figured out a way to style only certain areas in workflowy, actually 2.
First find the projectid of the bullet list you want to style. When using Chrome right click on your list item and click inspect element. There you can find all the projectids.
Then apply your style with stylish like this:
div[projectid=”e5205e6f-2cbb-7455-46d4-8719f63ace16″] div.content {
font-family: “Courier”;
}
quite some hacking… but cool 😉
the second way would be this: you have a stylesheet and a userscript that turns every note you tagged with #monospace into a monospaced area. coincidentally that’s what I’ve made yesterday.
userscript (for adding tags information into the dom-tree): https://gist.githubusercontent.com/lukemt/bd90b41e9603e0737a30/raw/9123a4c62e3dd7890cbf63d9a0801a31bfc6a999/WorkflowyStylableTags_slim_version.js
style (this style says that #monospace-tagged lists should have the font family Courier):
div.project.monospace-proj div.content {
font-family: “Courier”;
}
on how to install the userscript please read the blogpost from frank about the pictures integration.
Bye bye,
Luke
Luke!
Thanks, both hacks are amazing!
HACK 1:
Initially I thought one would have to get the projectid for every individual bullet in an outline… but now I see that it sets the same font style for all children lists in the hierarchy too!
Just like you said, you can then style whole WorkFlowy “areas” with the specific parameters you want. That solves the problem of toggling different user styles for different outlines (or underlining everything you want to show in a specific style). Brilliant!
What I recommend for people who want to work with different font styles across different outlines is to keep one style sheet for different “area” styles. You would then just grab the projectid for your different outlines and change the font-family accordingly. Something like this
/* Book project */
div[projectid=”1ea2bb9c-4d75-79e3-86d9-68c64e2d0229″] div.content {
font-family: Gotham;
}
/* Kanban Calendar */
div[projectid=”8b74ad8d-46f3-1e29-3f23-bb5614525ac6″] div.content {
font-family: Courier;
}
/* Life Logging */
div[projectid=”11f74b4a-9abd-3fec-29fa-7702ba68a96d”] div.content {
font-family: Monospace;
}
It’s a one-time setup and it only takes a minute. Awesome!
NOW THE 2ND HACK TAKES THE CAKE!:
After installing the Tampermonkey script you provided, I find that when you tag a parent list with a certain font, the entire outline will show in that font. All one needs to do in Stylish is the following:
/* TAG ANY OUTLINE WITH #monospace */
div.project.monospace-proj div.content {
font-family: Monospace;
}
/* TAG ANY OUTLINE WITH #courier */
div.project.courier-proj div.content {
font-family: Courier;
}
Whenever I tag an outline with #courier, the entire outline gets that font style. Same with the #monospace tag or any other font.
To make your font tags “invisible”, you could tinker with one of the following:
[title~=”#courier“] {
color: #ffffff !important;
}
OR
[title~=”#courier“] {
color: transparent !important;
}
One could then do a search throughout one’s account for any specific “font tags” and change them if necessary 🙂
Wow. This blew my mind. The combination of the counts + the charts … that’s fantastic.
You’ve come up with some amazing ways to leverage Workflowy. I like the usage of the tagging, that’s a simple way to do it. Speaking of extended character sets, there are some ascii chars that can simulate bar graphs as well, though it’s not as pretty:
https://workflowy.com/s/MpAg6bTWpO
Hi Rob, your use of Ascii characters is really creative! One could set up saved searches to filter for what you’ve proposed. I think quite a few minimalists may want to have a look see and tinker.
By the way, take a look at this Star Wars Asciimation:
http://www.asciimation.co.nz/
Hi MP, thanks for the awesome feedback 🙂
To answer some of your questions:
1. First of all, I have a template for each day. Multiple calendars would be tedious and unnecessary. The magic is in being able to filter for any area/ information/ tags you want within one composite outline and narrow things down to exactly what you’re looking for. Once I’m done revising each item for each day, I move everything to a month outline (You’ll see my setup in the link below). So basically, as you say, I dump everything into one outline/ calendar and filter. This does away with all the parent lists which would show up when filtering for multiple areas if they were in multiple outlines. The search results are more compact, and it’s easier to maintain/ revise daily.
2. The tag template has dates in each item because I need dates included with all entries… this allows me to filter for specific days or months together with areas I want to compare. Also, if I only want to take a look at my DBTC routines, I just filter for the infinity sign.
3. The second part of the same question: I have dates in the template so that I don’t have to manually write out dates every time I copy the template. I have a PhraseExpress script that copies the same date for me to each line each day when I run it. Look at this Animated GIF. The script is very crude but it works. Let me know if you’re interested.
4. The “timeline” at the top of the list: I have both of those at the top of the January outline. What I do is filter for whatever tags PLUS either “h2” or “h1”. h2 and h1 have different spacing (because my #n tags are obviously a different length to all other tags, which have 4 characters (#fdr). If you look at the screenshots in the post, you’ll see that the syntax in the search box is: “#z OR h1” / “w-p OR h2” (the “OR” operator needs to be uppercase). What this does is call up the relevant time scale for whatever I’m filtering for. The reason you don’t see “h1” or “h2” anywhere in the bullet in the above screenshots is because I have a simple Stylish code that makes the search result color (text and background) transparent. That code is in the shared list at the bottom of the post.
5. You’re right about having an example list to tinker with. Here’s my actual list. If you add it to your account or view it online, you’ll see that it will change daily. It’s what I’m using. I’ve added “?demo” to the end of the link, which will allow one to do more tinkering online. If you change anything around, don’t worry, it won’t affect my original list. It’s also got “META” and “AREAS” outlines. Initially I was lax to post any sort of example outline, because they will look nothing like in the screenshots if you are not using a Monospace font and don’t have colors set up in Stylish – but since you asked nicely…
I think I’ll add that outline to the actual post. That would definitely be helpful. Thanks for the suggestion. Also, you had some really valid questions.
Thanks for the explanation and posting the shared list. It makes so much more sense now! I’m definitely going to try adopting some sort of similar system. I am interested in the PhraseExpress shortcut. I’ve made a couple of my own scripts since reading your book but I’m not very adept yet.
I apply blunt force and paste the following parameters 15 times (I have 15 items):
{#CTRL {#SHIFT {#HOME}}}{#CTRL -chars V}{#DOWN}{#RIGHT -count 10}
And you thought I was smart. There must be a way to loop a certain string a certain amount of times… but I haven’t dug into that yet. My PhraseExpress tinkering involved simulating key presses one by one, ha!
With the above command pasted however many times (or a smarter solution), make sure you’ve changed the date on the first line and copy it before running your hotkey.
Ha! I was curious if that was what it was 🙂 Well, it’s still useful and maybe we can eventually come up with something better.
I’m still wrapping my mind around this whole concept. It’s so cool! Thanks again for sharing.
Wait until you see your own information in charts – over a period of time. Now that is worth writing home about 😉
Well, here’s a loop in PhraseExpress for the simulated keypresses I gave before:
{#loop {#CTRL {#SHIFT {#HOME}}}{#CTRL -chars V}{#DOWN}{#RIGHT -count 10} -count 15}
All you do is replace the “15” at the end with the number of items you have to replace… and depending on how many characters you have in your date phrase, you could adjust the “10” accordingly.
Love your book Frank. I have become a complete Workflowy convert since reading it, and now use it to do almost everything (I used OneNote, Todoist, and Scrivener before). These posts continue to open my mind to the almost limitless potential of Workflowy.
I’m a little confused about how you set everything up. Are you using multiple calendars in the life-logging section or just dumping all the tags into one calendar and filtering? Also, why does the tag template have dates next to it? And how did you set up the timeline at the top of the list?
Maybe you could share an example list? Sometimes an example goes a long way because you can play with it and pick up on concepts much faster. I learned a lot just from playing with Dee Jay Doc’s “Action Flow” shared list, and was able to adapt some of his methods to my needs fairly quickly.
I hope the posts keep coming and thanks for opening up the marvelous world of Workflowy to us late adopters!
And that’s why we have a software called EXCEL for these kind of purposes!
Hi Jack, thanks for weighing in 🙂
Excel inspired me to tinker with this today. It’s timeless!